Debug shader
SabaShader/Debug は、mesh と Built-in Render Pipeline から shader に渡される値を色として可視化します。texture やライティング表現を制作するための shader ではなく、avatar/world の mesh、UV、頂点データ、面方向、ライト入力を確認するための診断用 shader です。
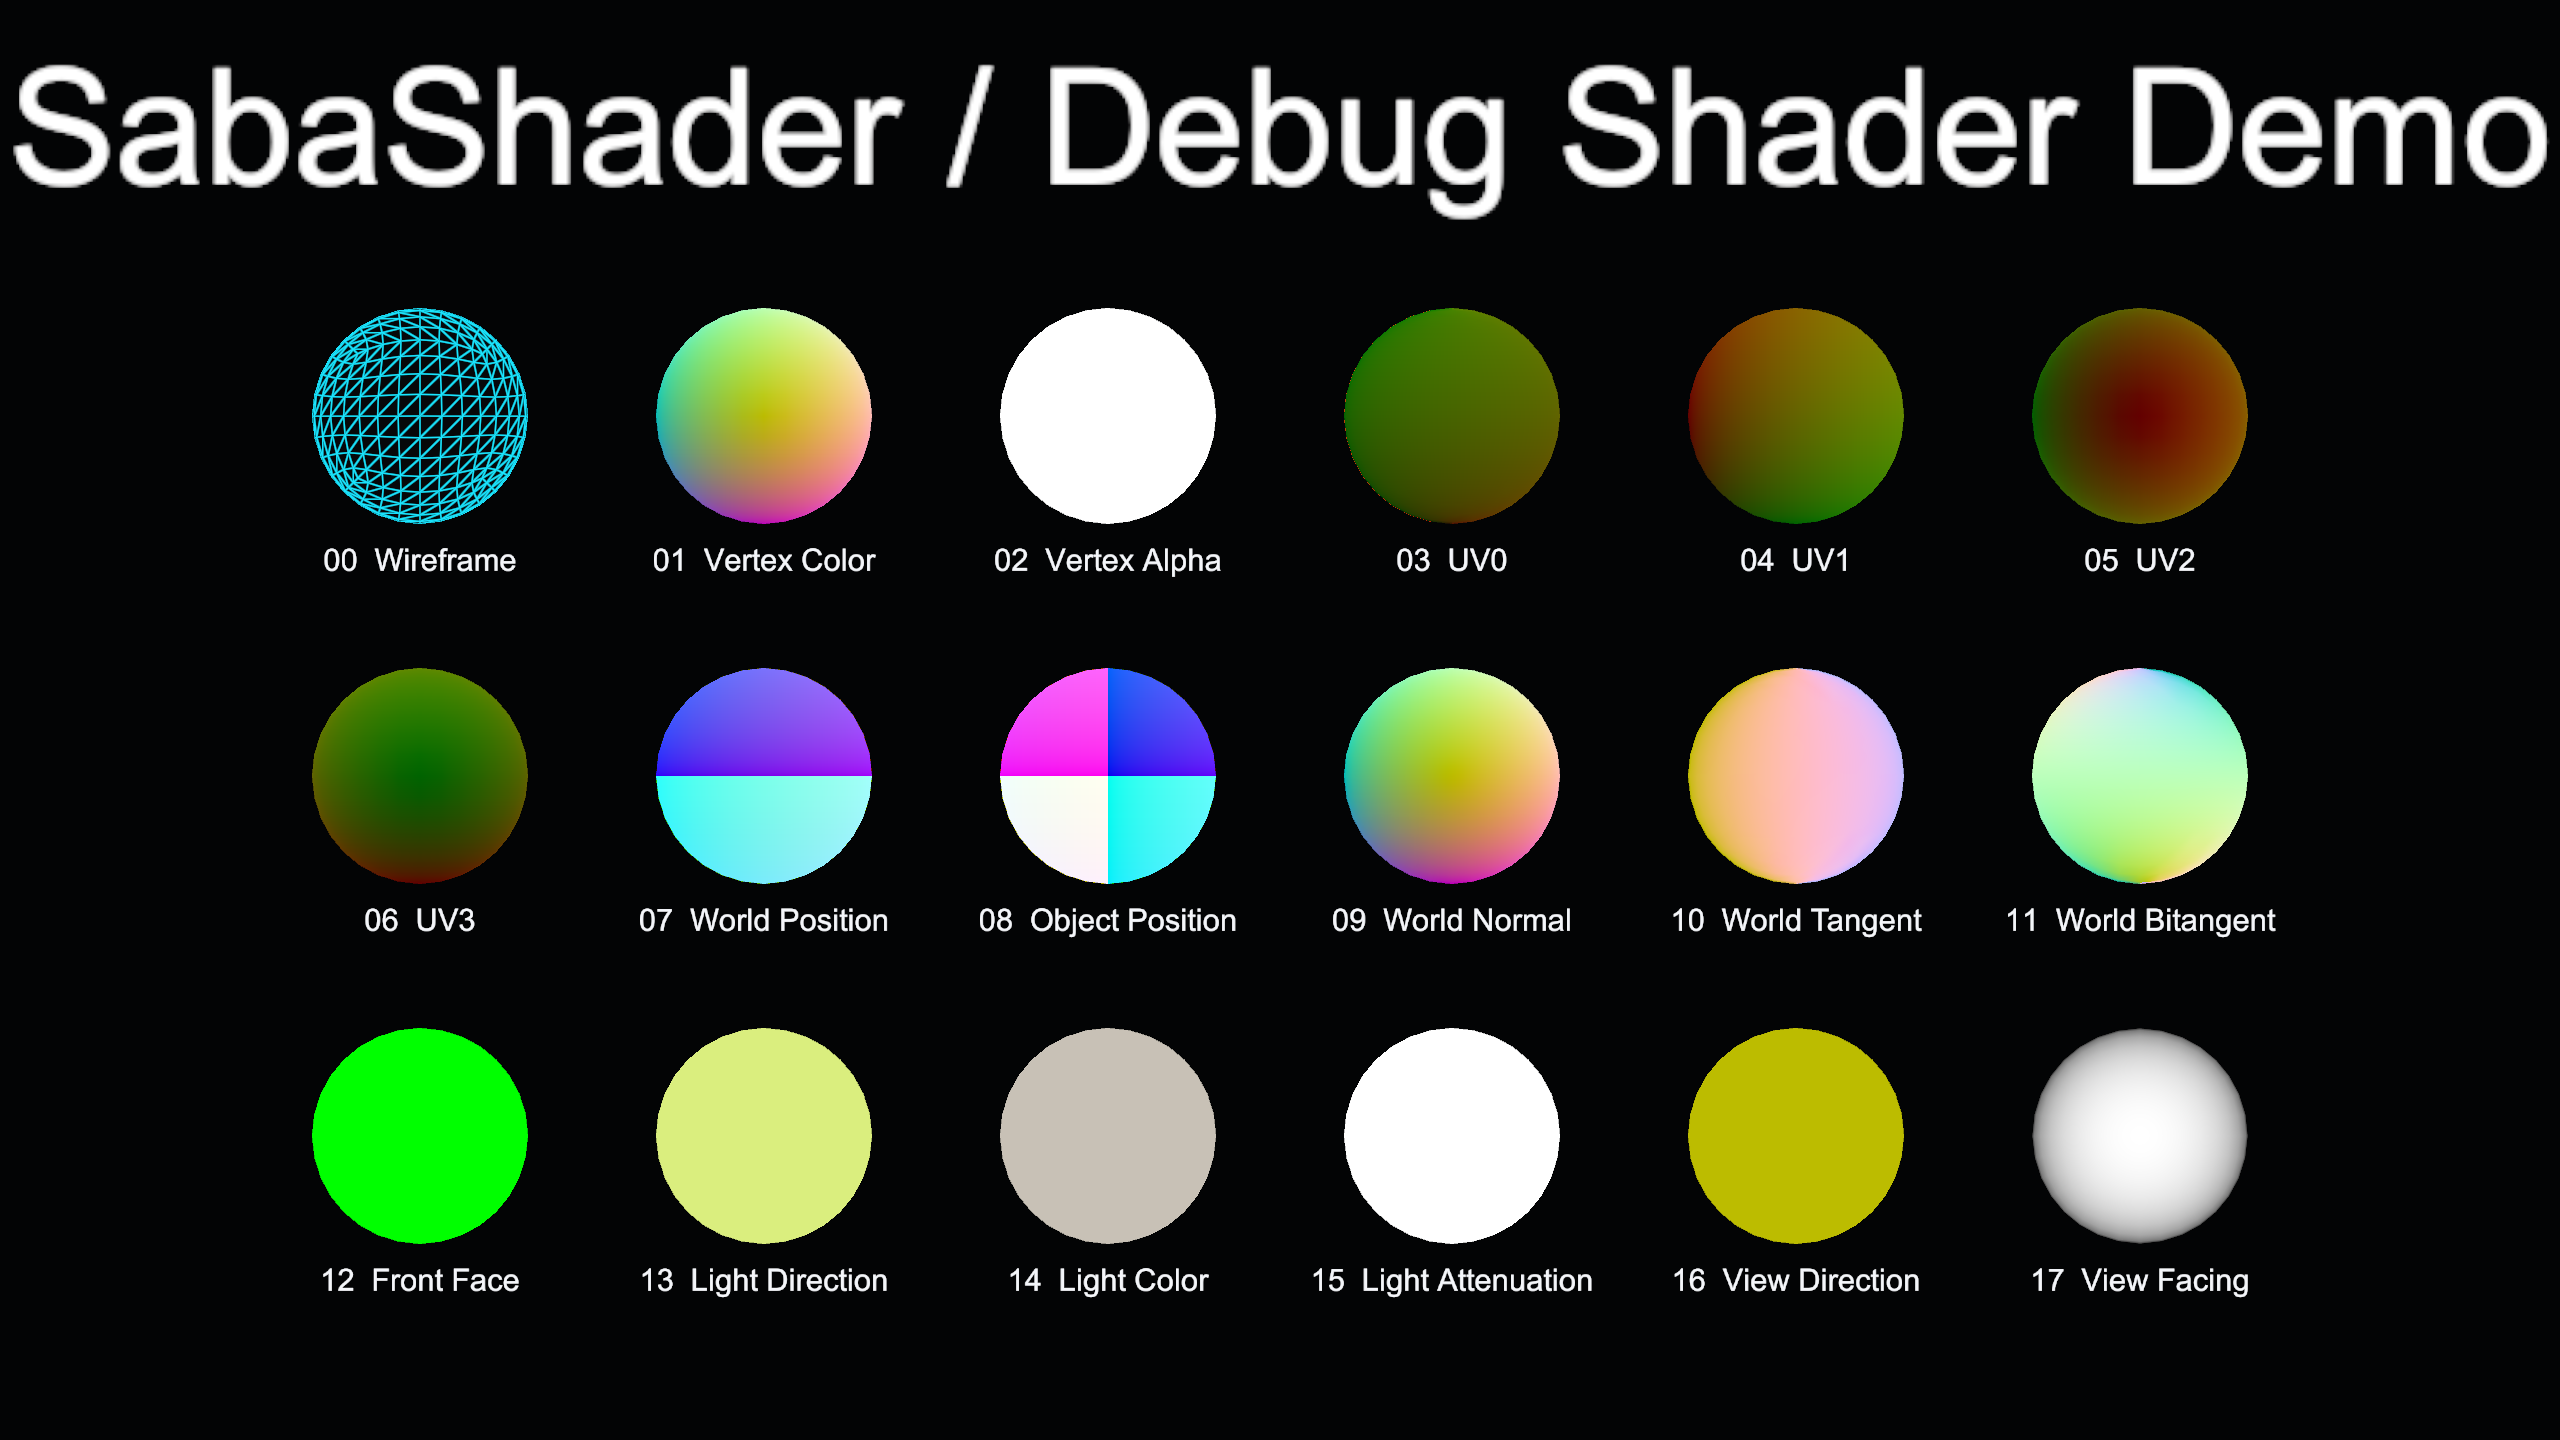
Demo Scene
Unity Package Manager で SabaShader を選択し、Samples の Debug Shader Demo を Import してください。Import 後は次のシーンを開きます。
Assets/Samples/SabaShader/<version>/Debug Shader Demo/DebugShaderDemo.unityシーンには全18モードが配置されています。同梱の DebugShaderDemoObject が、頂点カラーと UV0~UV3 を持つ一時 mesh と material を生成します。生成物には HideAndDontSave を指定しているため、sample 外のアセットは追加されません。
実際の avatar/world を調べる場合は、確認対象の material を複製して SabaShader/Debug を割り当ててください。確認後は元の material へ戻します。
使用方法
- 確認対象の material で
SabaShader/Debugを選ぶ Display Modeで可視化する入力を選ぶ- 裏面も確認する場合は
CullingをOffにする - UV または position の繰り返しが細かすぎる場合は
Coordinate Scaleを下げる - 問題箇所を特定したら、DCCツールまたは元の material/lighting 設定を修正する
Debug shader は元の texture や material 設定を参照しません。見た目を比較する場合は元 material を複製して保持してください。
パラメータ
| パラメータ | 初期値 | 適用モード | 内容 |
|---|---|---|---|
Display Mode | Wireframe | 全体 | 表示する診断値を選択 |
Culling | Off | 全体 | Off、Front、Back。裏面確認時は Off を使用 |
Coordinate Scale | 1 | UV、position | 入力へ乗算してから frac を適用する繰り返し倍率 |
Wire Color | green | Wireframe | triangle edge の色。HDR指定可 |
Background Color | black | Wireframe | triangle 内部の色。HDR指定可 |
Wire Width | 1 | Wireframe | screen-space derivative を基準にした線幅 |
Demo Scene では比較しやすいように Coordinate Scale = 0.25、Wire Width = 1.25 を使用し、Wire Color を cyan へ上書きしています。
色の読み方
表示色は診断値を見分けるための符号化であり、物理的な色ではありません。
UV0~UV3: R が U、G が V、B は 0。frac(UV * Coordinate Scale)を表示WorldPosition/ObjectPosition: RGB が XYZ。frac(position * Coordinate Scale)を表示- normal/tangent/bitangent/direction: XYZ の
-1..1を RGB の0..1へ変換 - alpha/attenuation/facing: 0 を黒、1 を白とする grayscale
LightColor: HDR の正値をvalue / (value + 1)で表示範囲へ圧縮FrontFace: 表面は緑、裏面はマゼンタ
符号付き vector では (0.5, 0.5, 0.5) がゼロです。例えば正の X は赤、正の Y は緑、正の Z は青が強くなります。
表示モード
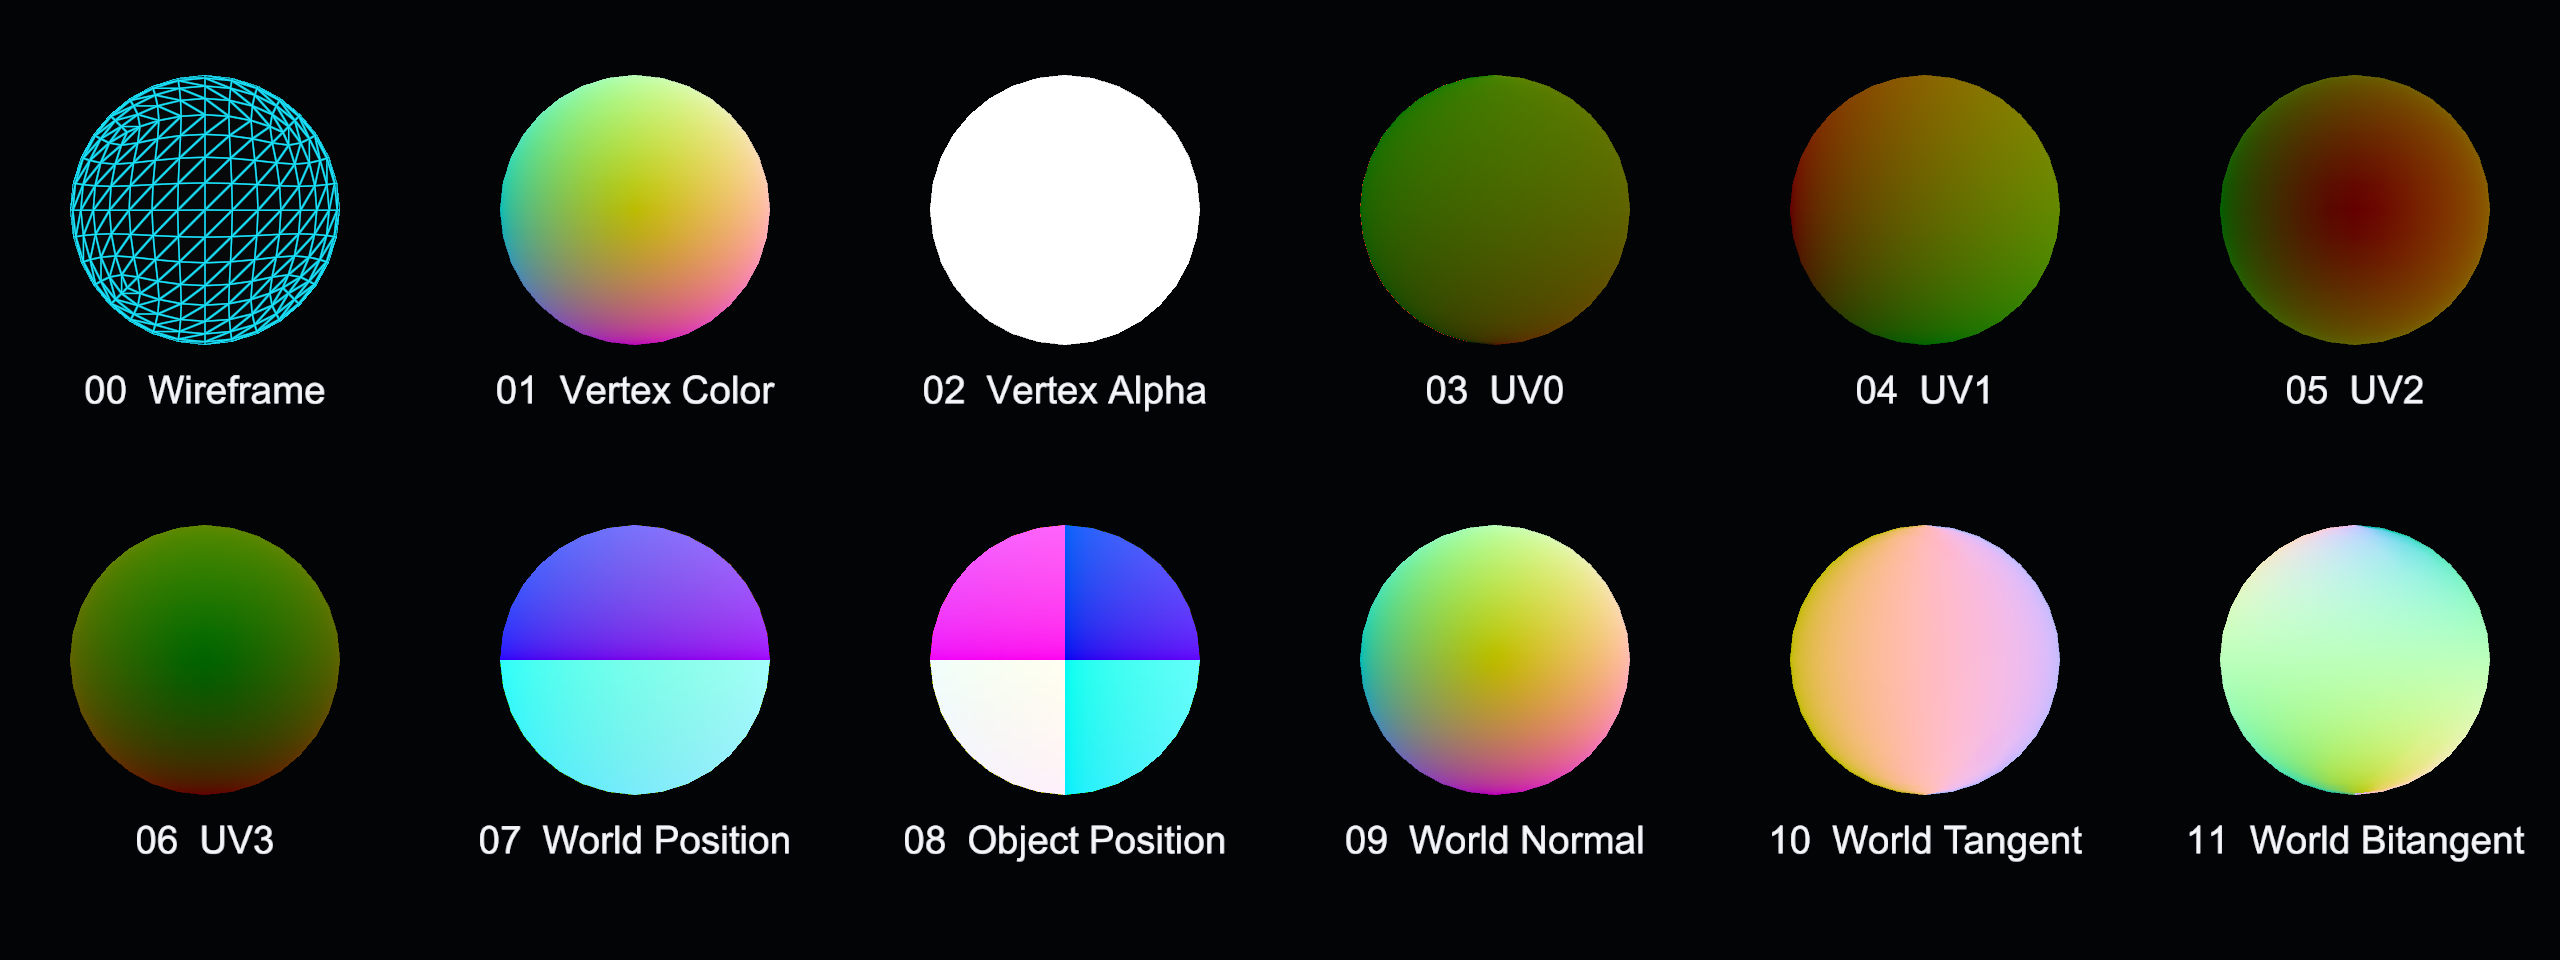
| # | モード | 表示する値 | 主な確認用途 |
|---|---|---|---|
| 0 | Wireframe | geometry shader で生成した barycentric coordinates | triangle 密度、細長い面、不要な分割 |
| 1 | VertexColor | vertex color の RGB | mask、頂点ペイント、import 結果 |
| 2 | VertexAlpha | vertex color の alpha | alpha mask、未設定頂点 |
| 3 | UV0 | 第1 UV channel | base texture の seam、反転、重複 |
| 4 | UV1 | 第2 UV channel | lightmap/追加UVの配置 |
| 5 | UV2 | 第3 UV channel | module 固有データ、追加UVの配置 |
| 6 | UV3 | 第4 UV channel | module 固有データ、追加UVの配置 |
| 7 | WorldPosition | world-space position の周期表示 | object 間の連続性、world-space effect の基準 |
| 8 | ObjectPosition | object-space position の周期表示 | mesh local space、scale/pivot の影響 |
| 9 | WorldNormal | world-space normal | smoothing、hard edge、法線の反転 |
| 10 | WorldTangent | world-space tangent | tangent import、mirrored UV、normal map の基底 |
| 11 | WorldBitangent | world-space bitangent | tangent sign、TBN handedness |
| 12 | FrontFace | rasterizer が判定した表裏 | winding、反転面、culling |
| 13 | LightDirection | surface から main light へ向かう方向 | directional/point light の入力方向 |
| 14 | LightColor | main light の HDR color | color、intensity、未設定 light |
| 15 | LightAttenuation | distance attenuation と realtime shadow attenuation | 影、point/spot light の減衰 |
| 16 | ViewDirection | surface から camera へ向かう方向 | view-dependent effect の入力 |
| 17 | ViewFacing | saturate(dot(normal, viewDirection)) | grazing angle、normal と視線の関係 |

診断例
Triangle topology
Wireframe で、意図しない高密度領域、極端に細い triangle、左右で異なる分割を確認します。表示しているのは実際の triangle edge であり、texture の格子や UV seam ではありません。
Vertex color と UV
VertexColor/VertexAlpha で mask の欠落や補間を確認します。UV は R と G の勾配が面内で連続することを確認し、不連続箇所が意図した seam と一致するかを見ます。UV の整数境界では色が繰り返されるため、seam 判定時は mesh の接続関係も併せて確認してください。
Normal と tangent basis
WorldNormal で hard edge と smoothing を確認し、WorldTangent/WorldBitangent で mirrored UV の境界や tangent sign を確認します。同じ向きの面で急に補色へ変化する場合は、法線反転または tangent basis の不連続を疑います。
Front face と culling
FrontFace と Culling = Off を組み合わせます。外側から見える面がマゼンタの場合は winding または負 scale を確認してください。髪の内側や服の裏側を調べる場合も、この組み合わせを使用します。
Light と view
LightDirection と LightColor で ForwardBase が選択した main light を確認します。影だけを確認する場合は LightAttenuation を使用します。rim、fresnel、反射など視線依存処理の入力は ViewDirection と ViewFacing で確認します。
Wireframe と対応環境
Wireframe は geometry shader で triangle ごとの barycentric coordinates を生成するため、shader model 4.0 が必要です。この Debug shader は全モードで同じ geometry stage を使用します。
| 環境 | 対応 | 理由 |
|---|---|---|
| Unity Editor/Windows PC | 対応 | Direct3D 11 で検証 |
| VRChat PC avatar/world | 対応 | custom shader を使用可能 |
| Metal | 非対応 | Unity の Metal backend は geometry shader 非対応 |
| VRChat Android/Quest | 非対応 | SDK同梱以外の custom shader を使用不可 |
細い triangle や遠距離では、screen pixel 基準の複数 edge が重なって見える場合があります。
制約
- 表示値は pixel shader へ補間された値です。vertex 単位の離散値も triangle 内では補間されます
LightAttenuationは ForwardBase の main light を対象とし、追加 light を個別には表示しません- position は絶対値ではなく周期色です。数値測定には RenderDoc 等を使用してください
- UV3 は
Wireframeの barycentric coordinates に使用しますが、他モードでは元の UV3 を保持します - Debug shader は module phase を公開しません。module によって診断結果が変更されることを防ぐためです
- Demo Scene の頂点カラーと追加UVは診断用に生成した値であり、avatar mesh の代表値ではありません
ドキュメント画像の再生成
このページの3画像は生成AIや合成画像ではなく、Unity 2022.3.22f1 の Camera 出力です。DebugShaderDemoBuilder.CaptureBatch が scene を再生成してから、解像度と Camera 範囲を固定して PNG を書き出します。
Unity で .ci/UnityProject を開いている場合は閉じてから、PowerShell で次を実行してください。
$unity = "C:\Program Files\Unity\Hub\Editor\2022.3.22f1\Editor\Unity.exe"
$arguments = @(
    "-batchmode"
    "-quit"
    "-projectPath", ".ci/UnityProject"
    "-executeMethod", "SabaShader.CI.DebugShaderDemoBuilder.CaptureBatch"
    "-captureOutputDirectory", "tests/golden"
    "-logFile", ".ci/UnityProject/Logs/DebugShaderDemoCapture.log"
)
& $unity @arguments
生成対象は debug_shader_demo.png、debug_shader_mesh_modes.png、debug_shader_lighting_modes.png です。画像の寸法は tests/test_debug_sample.py で検証します。